![]()
![]()
![]()
![]()

![]()
![]()
![]()
![]()
![]()
![]()
![]()
![]()
![]()
![]()
![]()
![]()
|
|
|
|
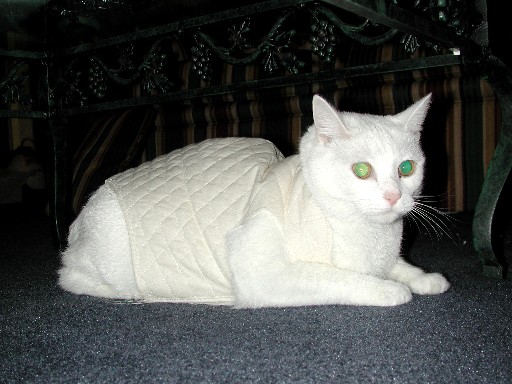
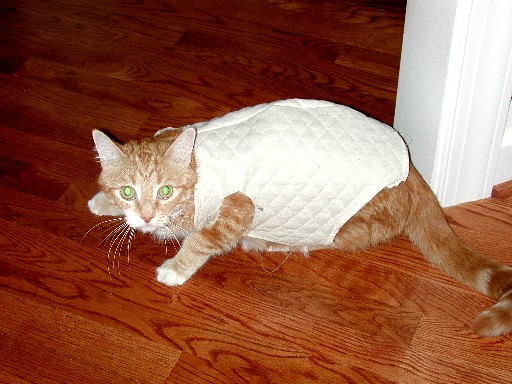
As a child I watched my Mother sew just about everything that could be sewn. Some of it rubbed off on me and while I never made anything by a pattern, I did manage to sew a number of things as a teenager. When I purchased Annabelle, I knew I wanted to replace the covers on the salon cushions. When I mention to my children that I intended to do this myself they were dismayed - but they had never seen their Father sew either. Since it had been over 30 years since I had last sewn, I decided to tackle covers for the forward V-berths first to get my feet wet. I had new V-Berth cushions made out of 3" foam and then purchased some lightweight quilted material along with some Velcro. Using my deceased wife's pink sewing machine I conquered the V-berth cushions. Next I turned my attention - much to their dismay - to my two cats. I had decided that they would wear a PDF (pet flotation devices) while on the boat, so I made them each a vest from the light quilted material that was left over. They were not impressed - you would have thought that the vests weighed 50 pounds the way they walked around. I also gave up on the idea of them ever wearing PDFs. So far only one has fallen in and that was when he hit my daughter's leg as they were both trying to disembark at the same time. He discovered he could swim, but was not happy about the discovery.
The salon cushions were next. I made templates using E size drafting paper of the largest part of the cushion, from which I cut the material. This worked well. Since I choose a material that had 4 inch squares in it, the trickiest part of these cushion covers was to make sure that the squares of one piece of material matched the squares on all the other pieces on that cushion - and the cushions beside it. Overall the project was not too hard and the cushions look good. For those who have never sewed before, I would like to give a
description of how the cushions were covered, and just how easy it is. The
first step is probably the hardest - what fabric (color and pattern) to
use! After a couple of visits to a fabric store, I found the material I
wanted. As noted above,
I
choose a fabric that had squares in it - this meant extra work to get the
squares to line up. A solid fabric or one with random patterns would be
easier for a first attempt since you do not have to try an align pieces. I
noted the width of the fabric and returned home to calculate how much I would
need. Fabric comes in a couple of standard widths - 45" or 60"
and purchased by the yard - you can get fractions of a yard. When you are
figuring how much material for something like a cushion, start with the largest
piece. This would be the top and bottom. In my case, the front of
the cushions were rounded, so I used a single piece for the top and
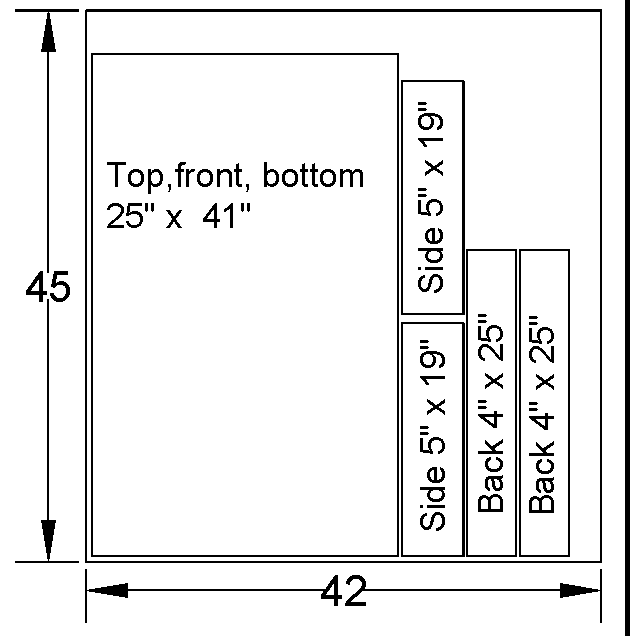
bottom. If the cushion is 24" wide, 18" deep and 4 inches
thick. This would make the main piece 24"x 40" (18" top +
4" thick + 18" bottom = 40"). The side pieces
would be 4" x 18" each. The back would be two pieces 2" x
24" (since we are going to add a zipper. You need to add to each of
these pieces 1/2 inch to each edge. So now are pieces are: If the pieces of the material can be oriented in any direction and is 45" wide, then we would need about 1 1/2 yards of material. I would lay it out as shown below:
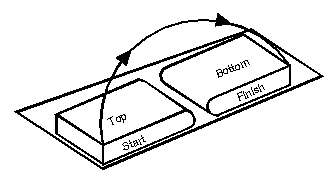
Once the material is in hand, it is time to cut it out. For the top-front-bottom piece, I make a template out of paper. Using some "E' size drafting paper (brown Kraft paper would do as well), I lay the back edge of the cushion 1/2 inch from the edge of the paper, and one side 1/2 inch from the edge of the paper. I then draw the width of the cushion, 1/2 inch from the other side of the cushion. Roll the cushion over and continue drawing the sides. Finish by drawing the back edge 1/2 inch from the edge. Mark the surface of the paper with the lines as "INSIDE" somewhere in the cushion area. Cut out the template following the lines. You should now have a template that if you wrap it around the cushion, will be 1/2 inch larger than the cushion on the sides and back.
With the curved front of my cushions, I made a template of one side by standing the cushion on it's side on a piece of drafting paper. I set the cushion so the back and top are 1/2 inch from the edge of the paper and then draw the rest of the side, again 1/2 inch from the cushion. Again mark the side of the paper that the cushion was against as "INSIDE". Cut the template out. Place the top-front-bottom template on top of the material you have chosen with the good side of the material up and the template side marked "INSIDE" down (against the material). Place a few pins in the paper and material to keep them from shifting and cut out the material along the edge of the template - do not cut the template. Next use the side template the same way to cut out two sides. Click here to see what my cut top-front-bottom piece looked like. Time to do some sewing. It is beyond my scope to give basic sewing machine lessons, so I will have to assume that you can thread the machine, wind and place the bobbin and set it up for a straight stitch. Your thread should ideally be a shade darker than the material. First we take the top-front-bottom and one of the side pieces. With the good sides facing each other, place the back corner of the side to the back corner of the top-front-bottom. Then pin the two pieces together, starting at the corner and working your way all the way around to the other back corners. If your measurements were super duper accurate, the final back corners will align perfectly. Typically, they will not - you should not be more than 1/4 inch off however. If you look at the base of the sewing machine, typically to the right of the needle/foot assembly, you will see a series of lines running from front to back with fractions on them. These are guide lines. We want to find the 1/2 inch line, and sew your seam so that the outside edge stays on the 1/2 inch line. This is why the templates are all made 1/2 inch larger on each edge! Do not try to sew over a pin - this will eventually cause you to break the needle - rather, remove each pin just as it gets to the foot. Go slow - this is not a race. Once you have one side sewn on, then take the other side and pin it to the other side of the top-front-bottom as before, making sure that the good side of the fabric is facing in. Sew it together. Now for the back. Since the back is rectangular, we can measure it and cut it out without having to use a template. Since we are going to put a full width zipper in, we need to pieces for the back. Each one needs to be 1/2 inch longer on each end than the width of the cushion. So if the cushion in this example is 24" wide, we need two pieces 25" long. This cushion is 4" thick, so we want our two pieces to cover have the back, so that would be 2" wide, plus the 1/2 inch, plus another 1" for a finished edge where the zipper will be. So we cut two pieces that are 25" long and 3 1/2" wide. The first sewing we do is to turn the 1" finished edge. Place the material good side down - using a fabric marker, draw a line 2" from the long edge on one side. Turn the edge of the material so that it lines up with the line you have drawn. You could pin the material to hold it in place until you sew it, but I like to use a basting tape to hold the material together. I purchased several sizes from Sailrite - look under "Webbing and Tapes" and then "Basting Tapes" and finally I use "Dacron Sailcloth Basting Tapes". Basting tape is a very thin double sided tape. Just roll it out on the edge of the material and cut to length. Press down hard on the tape to get it to stick really good and then peel the back off. Now turn the edge as before to meet the line you have drawn and press the edge down. I take a hard, smooth object and use it to crease the material where it turns. Make a pass 3/4" in from the edge with the sewing machine to keep the turned edged turned. Next pin the two back pieces onto the rest of the cover - again good sides in. Sew all the way around the edge 1/2 inch in. Time to see how well you have done! Turn the cover right side out and slip it over the cushion - if everything has worked as it should, the cover should be a good snug fit. Click here to see my finished cushion cover. To install the zippers, first I purchased zippers that could be cut to size. This is not the type of zipper on a jacket that has a finished end. Rather these zippers are never meant to have the foot come off either zipper. These zippers come with crimp pieces to keep the zipper from going to far when closing the zipper.. Cut the zipper to the length of the back (24 inches in this case). unzip the zipper almost all the way and place one half inside the back piece - lining up the zipper with the inside edge of the back. Use pins to hold it in place until you sew it in. Now place the other half of the zipper in - it is good to actually zip the two parts together during this step - and pin it in place. If zipped, unzip the zipper and sew the other side in place. Crimp the stoppers on the open end of the zipper. I always hand stitch around the closed end of the zipper to keep the zipper foot from damaging the zipper when closing. Place the cushion in the cover and zip it up. Not too hard was it? The first cushion is always the hardest and most nerve racking - but this is not rocket science. Take your time, think a project through, and there is nothing that can not be sewn. After the salon cushion project, I started making things from Sunbrella® fabric for use outside the boat. This is a material that is100% solution dyed acrylic cover cloth. Nothing will give better performance in sunlight. Colors are bright and stay that way. Breathes to prevent condensation and yet is quite water resistant. It is also a heavy fabric. Due to the type of "joints" I used, there were times that I could be sewing through as many as 12-14 layers - the old pink sewing machine was not up to this. I broke lots of needles and had very uneven stitching. Sailrite sells a wonderful machine for such work - but it's price was too high for me. Instead I purchased the top of the line mechanical Janome. This machine has enough power to go through the 12-14 layers of Sunbrella® and not bog down. The machine features a selection of stitches, easy threading needle and a button that will move the needle to the bottom of the stroke or back to the top of the stroke. I am sure there are other machines equivalent to my Janome - but this is the one I am familiar with. Other items I have sewn for Annabelle include: (pictures in the
future) Each project has had it's own challenges, but none that could not be overcome - a real sense of accomplishment when finished. Welcome to the world of sewing! |
|
Please address general comments to web@dv-fansler.com This page was last modified:
01/22/14 |